Introduction
Quidak sales module is crucial for managing all aspects of the sales process. Here are some key functions and benefits of the sales module:
-
Order Management: Streamlines the process of creating, tracking, and fulfilling customer orders.
-
Customer Relationship Management (CRM): Helps maintain customer information, track interactions, and manage leads and opportunities.
-
Sales Forecasting: Analyzes historical sales data to predict future sales trends, helping businesses make informed decisions.
-
Pricing and Discounts: Allows for the management of pricing structures, discounts, and promotions, ensuring competitive pricing.
-
Invoicing: Automates the creation and sending of invoices, ensuring timely billing and payment tracking.
-
Reporting and Analytics: Provides insights into sales performance, helping identify trends, top products, and areas for improvement.
-
Integration: Connects with other modules (like inventory, treasury and partner service) for seamless operations and data consistency.
-
Sales Team Management: Enables tracking of sales team performance and commissions, facilitating better management of sales staff.
Overall, the sales module enhances efficiency, improves customer satisfaction, and supports revenue growth
How to Create a Sale Invoice
To create a sale Invoice;
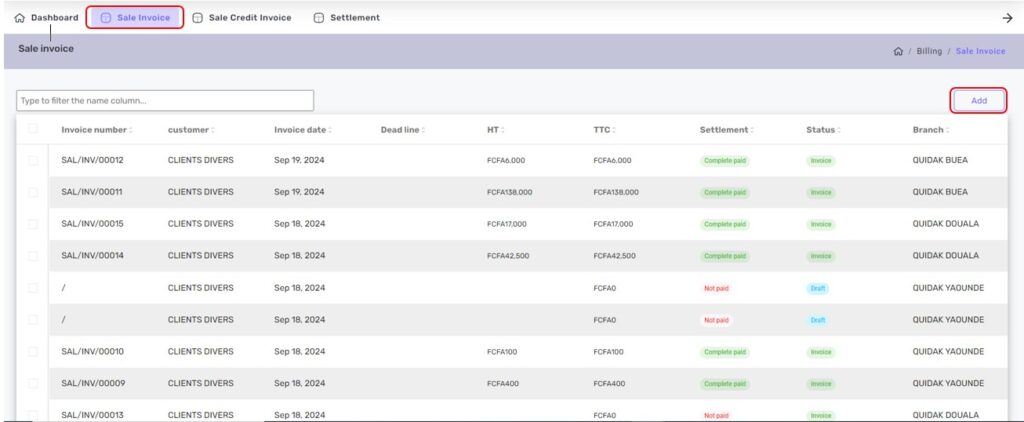
STEP 1 Click on Sale
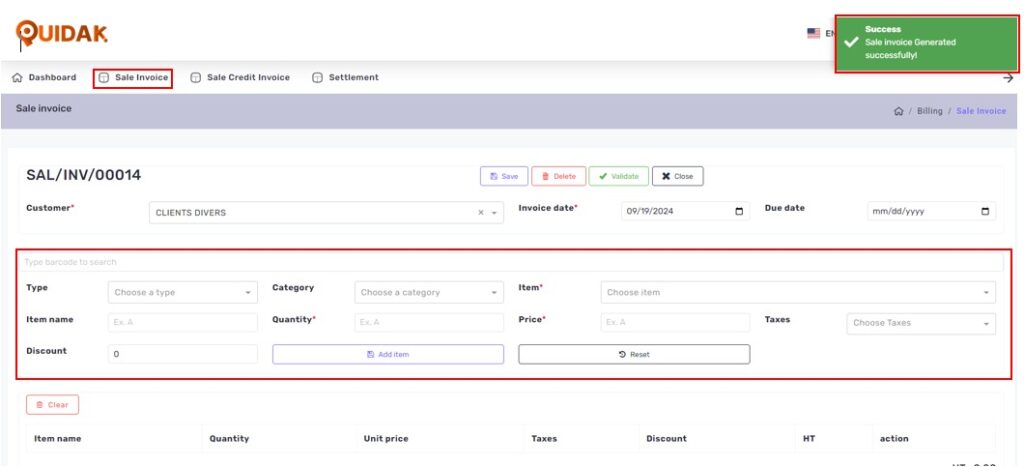
The invoice creation is done by clicking on the Add button, located in the top right corner of the table. When the button is clicked, a pop-up window Invoice generated successfully appears and the invoice form opens.
STEP 2 Click on Sale invoice
STEP 3 Click on Add Button
Invoices are automatically created as drafts for subsequent uses, they can also be reviewed and edited before validation.
The form below allows you to add products to the basket and save the invoice.
Fill in the form fields.
1: Fields with (*) are mandatory fields
2: The choice of Product is conditioned by Type and Category
3: The Diverse Customer is considered as a default customer if the latter is not informed.
- Success
The success popup message (alert), simply tell you that your action was successfully made. Success alerts displays on all successful actions on the software
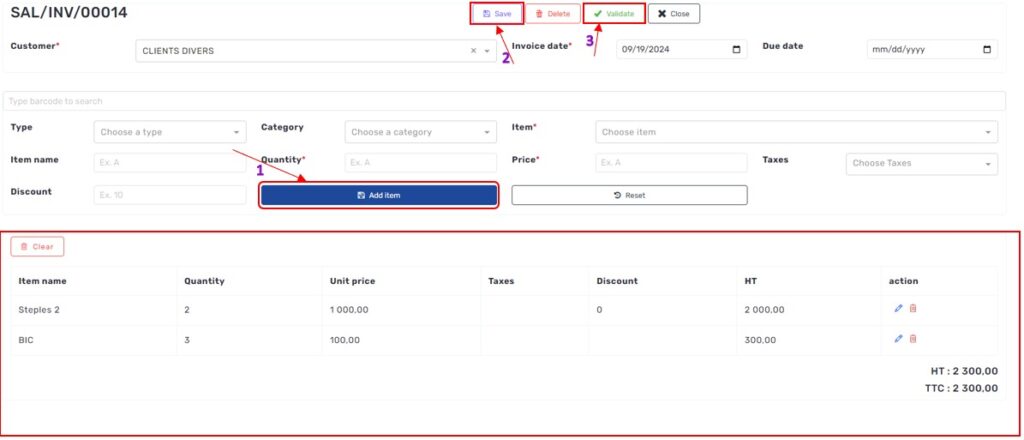
Once the fields are filled, click on Add a product. Repeat the action as many times as necessary depending on the number of products you want and click on Save.
From here, the invoice can be Saved and validated by clicking Validate.
- Save
The Save action adds the products from the cart to the previously generated draft invoice (see Image example below)
- Validate
The Validate Button give you more capabilities to take action on what you want to do with the saved sale credit invoice
- Delete
The delete action helps you to permanently delete your invoice, be it saved, draft or validated depending on your needs. Once Delete is done, Data cannot be retrieved.
- Add Item
Add item button helps you select and add items to the basket to form a combination of all the items you want to sale.
- Note
If an Add item button is not clicked after selection item information, you will not able to save the items you selected. That means, without the add item button, items can not be added to a sale invoice.
Validating the invoice changes its status from Draft to Invoice. It also brings up a new series of buttons at the top of the page
- Draft
A draft invoice is saved invoice which is not completed You can create invoices and save them for subsequent uses.
Once the form has been validated, the invoice status changes from Draft (1) to Invoice (2)
Button Features and Used Cases
- Return to Draft
allows you to return to the initial state of the invoice and restores draft status to the invoice.
- Draft Payment
allows you to Record a payment, which will automatically populate with the necessary information. Confirm that the information provided is correct and make any necessary adjustments. When you are ready, click the Create Payment button.
- Validatr payment
allows you to Record a payment, which will automatically populate with the necessary information. Confirm that the information provided is correct and make any necessary adjustments. When you are ready, click the Validate Payment button.
- Draft delivery
This operation brings up a Save delivery pop-up window. Click on the Generate delivery button. This action will create a line of delivery with a status draft.
- Validate Delivery
This operation brings up a Save delivery pop-up window. Click on the Validatedelivery button. This action will create a line of delivery with a status validate.
- Stock Out
This button allows you to create a line to remove from stock and to deduct the quantity sold from the available stock.
- Complete Sale
This button allows you to generate the payment, validate the payment, generate a delivery, validate the delivery, and remove it from stock.
- Preview Button
This button allows you to see the details of the invoice.
Once the billing process is complete, you have the option to generate a credit e.
Sale Return or credit invoices are only generated after full payment of a credit invoice. see image below.


