Introduction
The sale credit invoice (sale return) functionality is vital for efficiently managing product returns, maintaining accurate inventory and financial records, and enhancing customer service. This feature helps businesses streamline their operations and improve overall customer satisfaction. It includes;
1. Return Management: It facilitates the process of customers returning products they purchased. This could be due to defects, dissatisfaction, incorrect orders, or other reasons.
2. Inventory Adjustment: When a product is returned, the inventory levels need to be updated. The sale credit invoice allows the system to adjust the stock accordingly, ensuring that inventory counts are accurate.
3. Financial Accuracy: The credit invoice helps in maintaining accurate financial records. It reflects the decrease in revenue due to the return, adjusting the accounts receivable and sales figures.
4. Customer Relations: Handling returns efficiently can enhance customer satisfaction. A streamlined process through the ERP system makes it easier for customers to return items and receive refunds or credits.
STEP 2 Click on Sale Credit Invoice
STEP 2 Click on the Add Button
- Note
the Add Button helps you to create a new sale credit invoice if in case you have some products that were returned by a customer.
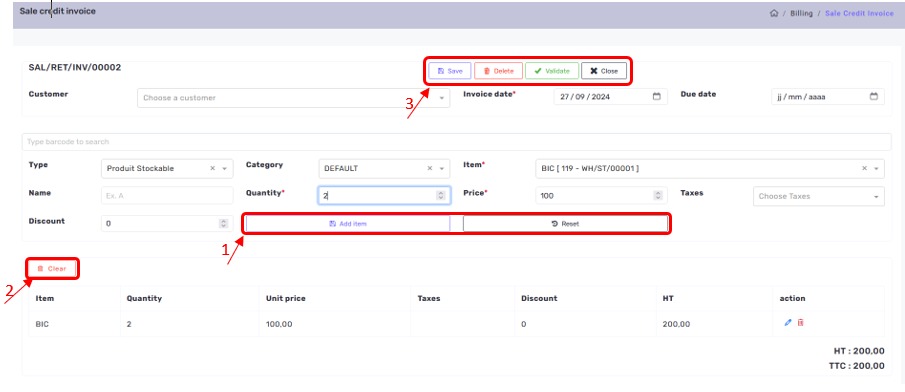
STEP 3 Fill the invoice form with all the details required to make a sale invoice.
STEP 4 Click on Add Item to add the item to the sale cart
Once you are done adding items,
STEP 4 Click on save. you can click on validate if you are making a sale at once.
- Add Item
Add item button helps you select and add items to the basket to form a combination of all the items you want to return.
- Note
If an Add item button is not clicked after selection item information, you will not able to save the items you selected. That means, without the add item button, items can not be added to a sale credit invoice.
- Save
The Save action adds the products from the cart to the previously generated draft invoice (see Image example below)
- Delete
The delete action helps you to permanently delete your invoice, be it saved, draft or validated depending on your needs. Once Delete is done, Data cannot be retrieved.
- Validate
The Validate Button give you more capabilities to take action on what you want to do with the saved sale credit invoice
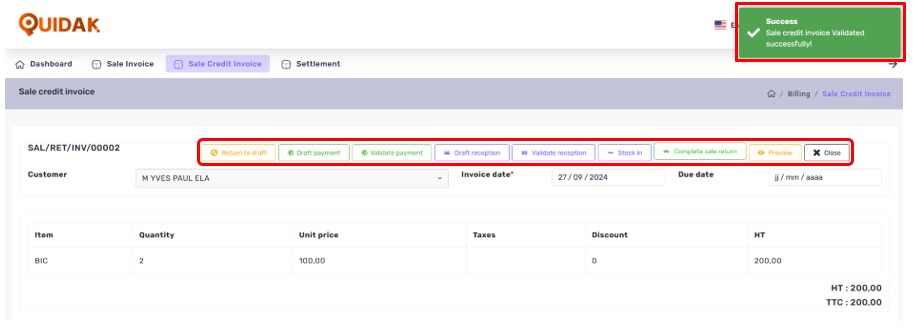
Once the Validate Button is Clicked, you will have a range of action buttons displayed for you to complete your sale credit invoice
- Return to Draft
allows you to return to the initial state of the invoice and restores draft status to the invoice.
- Draft Payment
allows you to Record a payment, which will automatically populate with the necessary information. Confirm that the information provided is correct and make any necessary adjustments. When you are ready, click the Create Payment button.
- Validatr payment
allows you to Record a payment, which will automatically populate with the necessary information. Confirm that the information provided is correct and make any necessary adjustments. When you are ready, click the Validate Payment button.
- Draft delivery
This operation brings up a Save delivery pop-up window. Click on the Generate delivery button. This action will create a line of delivery with a status draft.
- Validate Delivery
This operation brings up a Save delivery pop-up window. Click on the Validatedelivery button. This action will create a line of delivery with a status validate.
- Stock In
The buttons above all have their uses and functionalities. It is recommended to follow the guide and master the functions of each button. These will reduce mistakes in every process.
- Complete Sale Invoice
This button allows you to generate the payment, validate the payment, generate a delivery, validate the delivery, and remove it from stock.
- Preview Button
This button allows you to see the details of the invoice.
Its recommended for user to study the functions of the buttons mentioned in this article to avoid making mistakes during operations


